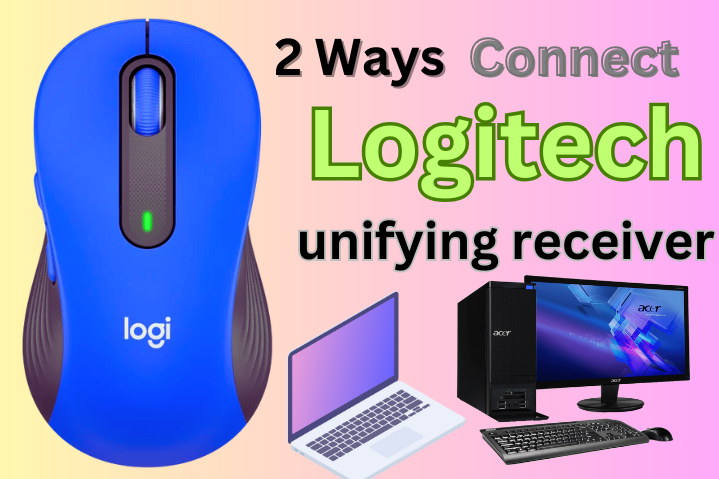
The Logitech Binding Together collector is a USB dongle that permits you to interface up to 6 viable Logitech Devices (mice, trackballs, keyboards) without a moment’s delay. A unifying receiver can be purchased, or it may come with an existing mouse or keyboard. It is simple to connect your Logitech mouse to a Unifying receiver as long as it is compatible. This Mraiexpress guide shows you how to interface a Logitech mouse to a Bringing Together beneficiary utilizing Logitech Binding Together Programming and the Logi Bolt application.
What You Need to Know
- To connect your mouse to your Unifying receiver, you can use the Logitech Unifying Software or the Logi Bolt App.
- Binding together beneficiaries have orange suns on them. There are yellow lightning bolts on Logi Bolt receivers.
- Not all remote Logitech mouses are viable with Binding together recipients.
Method 1: Using the software for Logitech Unifying
Introduce Logitech Binding Together Programming.
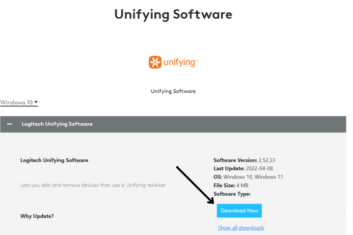
Logitech’s Bringing Together Programming is accessible for all renditions of Windows, including Windows 11 and 10. Logi Bolt is a better alternative if you’re running a more recent macOS version than High Sierra on your Mac.
- Go to https://support.logi.com/hc/en-us/articles/360025297913-Logitech-Binding together Programming in an internet browser.
- If you don’t have a functioning mouse by any stretch of the imagination, look at our advisers for utilizing your PC without a mouse and clicking without a mouse.
- Select your operating system from the drop-down menu on the upper left.
- Save the file to your computer by clicking “Download Now.”
- If you’re utilizing a Macintosh, unzip the file.
- Double-tap the downloaded record.
- Adhere to the on-screen directions to introduce.
Open the Logitech Binding Together Programming and snap Straightaway.
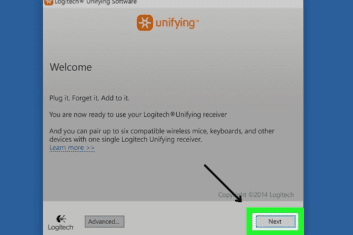
To open the software, click Logitech Unifying Software in your Applications folder or the Start menu if it does not launch automatically.
Click Next after connecting your unified receiver.
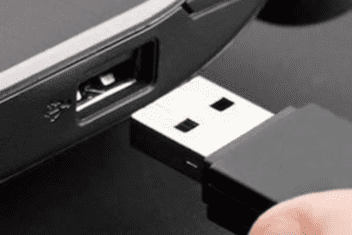
You can embed your Bringing Together beneficiary into any free USB port on your PC or Macintosh.
- Your receiver may not be a Unifying receiver if it is not detected. Search for an orange sun symbol on the recipient — on the off chance that you don’t see this symbol, this technique won’t work.
- On the off chance that your recipient has a yellow lightning bolt, you have a Logi Bolt beneficiary. The Logi Bolt App can be used to connect a Logi Bolt-compatible mouse in this instance.
- On the off chance that you have a Logitech mouse that was recently associated with your PC, it could be shown on-screen alongside any similar data. Click Next to proceed if your mouse is compatible with the receiver.
Restart your mouse.
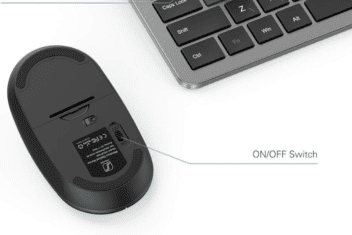
The bottom of your Logitech wireless mouse has an on/off switch. Flip the mouse over, turn the switch off, and then turn it back on. The receiver and mouse should automatically pair.
- If your mouse is not found, either its batteries need to be replaced or charged, or it is not compatible with Unifying.
Verify that the screen’s cursor is moving.

Check to see if the cursor on the screen is moving by moving the mouse.
Click Next after selecting “Yes.”
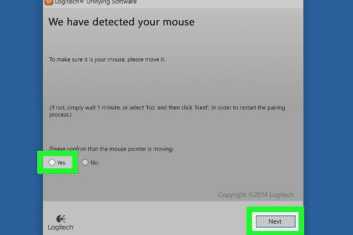
Click the radio button next to Yes if the cursor on the screen moves when you move the mouse. This will let you know that the right device is connected. Next, then click.
Select “Finish.”
It’s in the lower-right corner. Now that your Logitech mouse is connected to the unified receiver, you can use it.
Method 2: Utilizing Logi Bolt
- Get the Logi Bolt app installed. You can connect a compatible Logitech mouse to either a Unifying or Logi Bolt receiver[6]. However, if you have a Unifying receiver—the kind with the yellow sun on the housing—you won’t be able to connect a Logi Bolt mouse to it—only a Unifying mouse. To download:
- Visit https://support.logi.com/hc/en-us/articles/4418089333655 for more information.
- Check out our guides on how to use your computer without a mouse and click without a mouse if you don’t have one at all.
- From the drop-down menu on the left of the screen, choose your operating system.
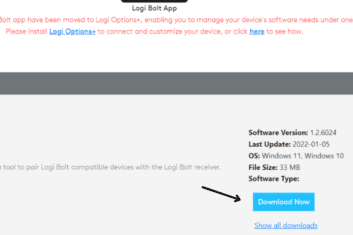
- Click Download Now to save the document to your PC.
- If you have a Mac, unzip the file.
- Double tap the downloaded document, and adhere to the on-screen directions to introduce.
Open Logi Bolt.
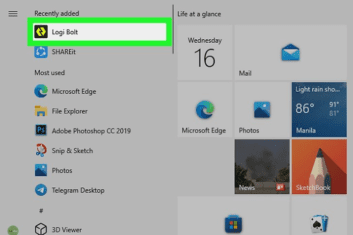
In the Windows Start menu or the Applications folder on your Mac, select Logi Bolt after it has been installed.
Click ADD NEW Devices.
A rundown of collectors will show up.
Choose the Logi unified receiver.
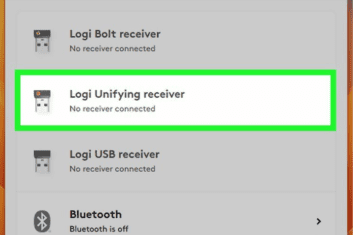
On the other hand, if you have a Logi Bolt or Logi USB recipient associated, select that collector all things considered.
Switch your mouse on and off.
The bottom of your Logitech wireless mouse has an on/off switch. Flip the mouse over, turn the switch off, and then turn it back on. The receiver and mouse should automatically pair.
- Close the installer and test your mouse by following the on-screen instructions.