Need to interface peripherals to your iPhone/ iPad/MacBook or Phone? I’ve tried everything, wirelessly, through USB-C, and Lightning. This is the way you can do so and what to bear in care.
Did you have any idea that you can utilize your cell phone or tablet with a mouse, a keyboard, and, surprisingly, a screen? You can even connect them all at once. How useful is this in real life? On that, I will soon publish a separate article. This one is all about getting things in order.
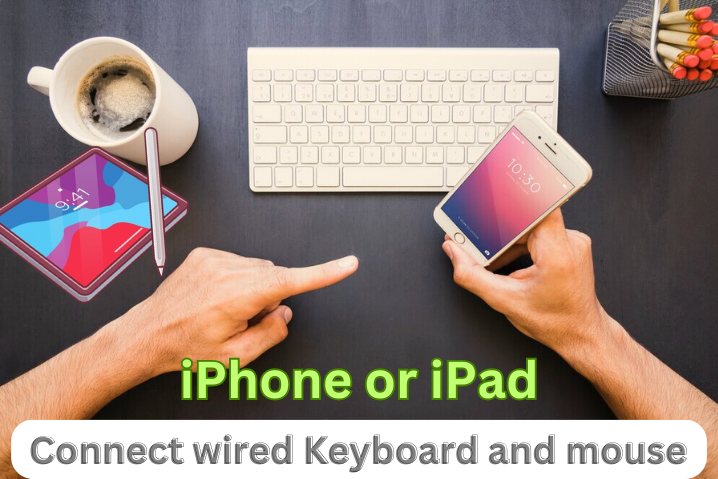
Disclaimer: Only iPhone and iPad owners should read this. Things work diversely on Android and from one gadget to another.
Be aware that the iPad’s external device connection procedure differs from that of the iPhone. It also matters whether your device has a USB-C or Lightning port. Although USB-C makes things easier and better in many ways, peripherals can typically be connected via Lightning as well.
Connect a mouse
A wireless mouse can be paired and connected via Bluetooth in the same way that a computer can. How to do it: open Settings, tap «Bluetooth» and look down. Presently, put the mouse into matching mode. (This is accomplished by pressing a button on the mouse’s underside.) The mouse ought to now show up under Different Gadgets. To connect, tap on it. It will now connect whenever it is available automatically.
Odds are you’ll in any case need to utilize that equivalent mouse on your PC, which is the reason it’s ideal to go for a model that supports matching with various gadgets. The Logitech Vertical and the Logitech MX Master 3A, for instance, both have a button on the bottom for switching between devices.
You can likewise interface a wired mouse to your iPhone or iPad. Simply connect the mouse to your devices if they all use USB-C. You will require an adapter if your mouse uses USB-A, as many do.
You will also need an adapter or a cable with fitting ends if your Apple device still uses the older Lightning connector. Both are likewise accessible for USB-A.
Mouse settings
You should change the mouse settings to get the best working environment possible. You are actually compelled to do so on the iPhone; It is necessary to activate the mouse.
On the iPad

When you connect the mouse to the iPad, the mouse pointer will appear as a dot and disappear when you disconnect it. At the end of the day, it works with the default settings. All things being equal, I suggest you open Settings, go to «General» > «Trackpad and Mouse», and change the speed of the pointer as well as deactivate Normal Looking over. The mouse wheel won’t move in the usual direction if you don’t do the latter.
On the iPhone
On the iPhone, not so much. To use the mouse, open Settings, select “Accessibility,” and then turn on “AssistiveTouch.” Now you’ll see a dot representing the mouse pointer.
Notwithstanding the pointer, a virtual button will create the impression that opens the AssistiveTouch menu. It can be positioned anywhere on the screen and set up with up to eight functions.
The virtual button doesn’t go away automatically when the mouse is disconnected, which is annoying. Only when a mouse is connected can you set it to remain hidden? To do this, explore «AssistiveTouch» and deactivate «Always Show Menu».
It would be best if you made a shortcut to make it easy to turn on and off AssistiveTouch. Like that, you will not need to go through Settings without fail. This is the way to make an easy route: Select “Shortcut” from the “Accessibility” section in Settings. Add AssistiveTouch as a shortcut after that. You’ll presently have the option to turn AssistiveTouch on and off by squeezing the side button multiple times.
Furthermore, you can add the alternate route to the Control Community through Settings > «Control Centre» > «Accessibility Shortcut» (situated under «More Controls»).
On the iPhone, changing the direction of the scrolling is also a good idea, as was mentioned for the iPad.
On the wired Macbook, Phone, or Ipad
How to connect the mouse and keyboard to the Macbook or phone? You can use the Anker USB C Adapter to connect the mouse and keyboard.
Connect a Keyboard

To interface a keyboard, it’s likewise best to do so by means of Bluetooth. The Logitech MX Keys are one example of a keyboard that lets you switch between multiple paired devices.
A wired keyboard is also an option, but it can be even more difficult to use than a mouse. Using an iPad or iPhone with a USB-C port is simple enough; It works as soon as you plug it in. Once more, in the event that your keyboard utilizes USB-A, you’ll require a USB-C connector.
The tricky part comes next: You will require a USB adapter that can simultaneously connect a power adapter to your Apple device if it has a Lightning port. Even in the event that the keyboard does not have a battery or lighting, the device will complain that it uses too much power.
To take no chances, purchase the first connector from Apple (despite the fact that it’s costly). A power adapter with at least 20 watts is required for it to work.
The uplifting news is assuming that a connector works with one keyboard, it’ll work with any keyboard. An extreme use case is for example: an iPhone-paired keyboard from the 80s. Because it is not a USB keyboard, you will need a different adapter for it.
Keyboard settings
You’ll have the option to type text immediately, without arranging anything. However, there is a good chance that you will want to use the keyboard for hotkeys in addition to writing, so I suggest looking at the settings.
On the off chance that you’re utilizing a Windows keyboard, get to know its unique keys. In the Apple universe, the Command key (cmd) is the same as the Ctrl key. On a Windows keyboard, cmd will be planned to the Windows key of course. All in all, to utilize the easy route Ctrl + Z, you’ll really need to squeeze Windows + Z. In the event that you could do without this, you can reassign the unique keys under «General» > «Keyboard» > «Hardware Keyboard». This is where you can plan cmd to the Ctrl key, for example.
The absence of the Fn key is an issue with many Windows keyboards. This can’t be appointed around the world to another extraordinary button. A few orders on iPhone and iPad depend on Fn. On the iPad, for instance, you can use Fn + A to show or hide the dock. What you can do this: Set Fn to the Alt key (or another key) in Settings > Accessibility > Keyboards > Full Keyboard Access >Commands.
Important: you’ll need to do this for every individual order. Additionally, there is another issue.
The Full Keyboard Access feature, which goes far beyond what I have described thus far, includes the commands that you can define yourself. Full keyboard Access is a far-reaching control framework that goes a long way past simple keyboard easy routes. It allows you to completely navigate without a mouse.
At the point when actuated, your gadget will be altogether different to work. I don’t like it. Full keyboard Access frequently impedes me, particularly while I’m attempting to compose. For instance, I’ll unintentionally set off an order when I simply need to type something.
Connect a display from outside
Any 16:9 display you connect the iPad to will have black bars on the sides due to its 4:3 aspect ratio. The iPhone, then again, has a viewpoint proportion of around 20:9, significance you’ll have dark bars at the top and lower part of the showcase. In representation mode, you’ll have colossal dark regions on the left and right.
When you turn the iPad or iPhone 90 degrees, the image on the display will generally also rotate. Keep in mind that landscape mode is rarely available on the iPhone, such as on the home screen or in the settings. I would love to have a rotating external monitor as well; I cannot be.
In the event that your iPhone or iPad has a USB-C port, you can interface the presentation through USB – gave it upholds picture signal transmission by means of USB, which isn’t the least bit guaranteed.
In that case, you will require an HDMI adapter. There’s one from Apple, yet it’s costly and incorporates no links. On the other hand, you can utilize the Samsung Dex connector, which has every one of the fundamental parts. Although you can see it in action in the video below, I have not personally tested it.
It goes without saying that you will also require an adapter if your iPad or iPhone has a Lightning port. Once more, cheap alternatives won’t work. I suggest going for the costly unique connector from Apple.
I’ve tried it and it works, yet the nature of the picture yield is disheartening. Apple claims that the adapter can transmit “up to” 1080p. That amounts to 1,440 x 1,080 pixels with a 4:3 aspect ratio. However, I’m not particularly bothered by the low resolution; rather, it’s the way that antiquities – like phantom edges. Basically, maybe the information is being shipped off the screen in a profoundly packed structure.
Connect multiple devices at the same time
It is time to unite everything. In the event that you have an iPhone or iPad with a Lightning port, you’re best off associating the mouse and keyboard over Bluetooth. As a result, the external display can use the Lightning port.
A USB hub is required if you want to connect multiple wired devices. The awful news: Over Lightning, this is likely to be difficult. I tried everything, but it didn’t work. Ensure that your hub has its own power supply if you decide to try it anyway; Lightning only has the capacity to provide one with sufficient power. Yet, and still, at the end of the day, odds are it won’t work.
A hub is more likely to function with an iPhone or iPad that supports USB-C. However, neither can I guarantee it. The keyboard and mouse have worked with each center point I’ve attempted, yet the showcase and we haven’t. The HP Dock G5, which is actually designed for notebooks, was a dock that consistently worked for me with the iPhone 15, internet included.
Having a different power supply is likewise firmly suggested with USB-C. You might find that your center point works without it, however the battery of the iPhone or iPad will deplete rapidly.
Utilizing a center point, you can kill a few birds with one stone. One benefit is that you don’t have to deal with USB-A adapters.
What’s more, it permits you to likewise interface an SSD. Last but not least, your iPhone or iPad is wired to the internet and the power.
In a subsequent article, I will discuss how (im)practical it is to work with external iOS devices.