
Is it necessary to connect a wireless Logitech mouse to your computer? Whether your new Logitech remote mouse works over Bluetooth or utilizes a little USB RF unifying receiver, interfacing it with a Windows PC, Macintosh, or Chromebook will be simple. You’ve come to the right place if you’re feeling intimated, having trouble, or don’t know where to start! This Mraiexpress article will walk you through matching any Logitech remote mouse with your PC or Macintosh and assist you with taking care of any issues that could spring up en route.
Things to Consider
- If your mouse includes a wireless dongle, connect it to a USB port and turn it on. Ensure it has a long battery life.
- Start your Bluetooth mouse on Windows and pair it. Then, at that point, go to Settings > Bluetooth and gadgets > Add gadget > Bluetooth > and click your mouse.
- On Macintosh, turn your Bluetooth mouse on and begin matching. Click your mouse to navigate to Bluetooth in System Settings.
1st Method: Using a Wireless Receiver
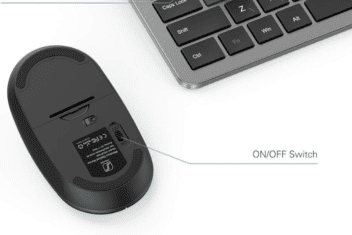
Step 1: Turn on the Logitech mouse. Most of the time, the On/Off switch is on the bottom of the Mouse.
- Assuming your remote mouse needs batteries, open the battery compartment on the base and check if it takes AA or AAA batteries. The battery compartment’s diagram should be followed when inserting the batteries.
- A few remote mice might charge utilizing a USB link. Make sure your mouse has a USB port.
- If so, connect a USB cable that is compatible with the mouse to a free USB port on your computer. Give it a few hours to charge.
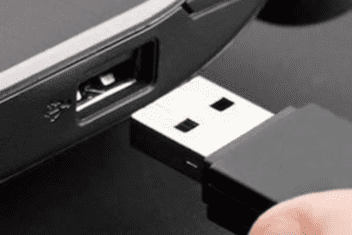
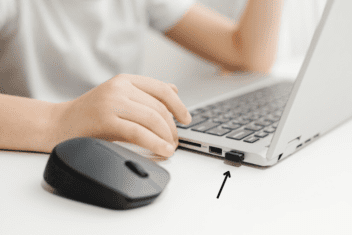
Step 2: Connect the wireless receiver. You can plug the wireless receiver, which is a small USB device, into any USB port on your PC or Mac that is open.
- The USB ports are typically located on the sides of a laptop computer, whereas they are typically located on the back of a desktop computer.
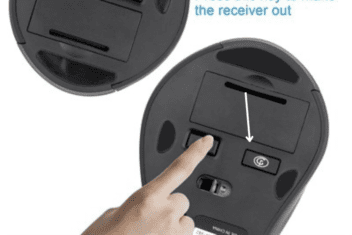
Step 3: If necessary, press the Connect button. The Associate button is by and large on the lower part of the remote mouse. You might require a paperclip or a slight instrument to press the interface button. At the point when the remote mouse interfaces with the recipient, you can utilize it on your PC, Macintosh, or Chromebook.
- There isn’t a connect button on every wireless mouse. Some will automatically connect.
- Consult the mouse’s user manual or the manufacturer’s website if you can’t find the Connect button.
- On the bottom of some Logitech wireless mouse models is a Channel button. Before pairing your wireless mouse with the wireless receiver, select a channel by pressing the Channel button if it has one.
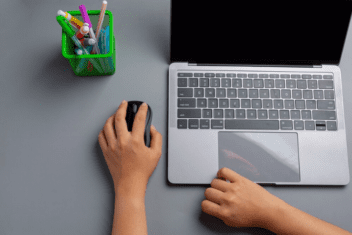
Step 4: Move the mouse this way and that. You should be able to see the mouse cursor move across the screen as soon as the wireless receiver detects the mouse. It might require a couple of moments.
2nd Method: Windows Bluetooth usage
Step 1: Make sure the battery in your mouse is fully charged. AA or AAA batteries are needed for some wireless mice. Other wireless mice use a USB connection to charge.
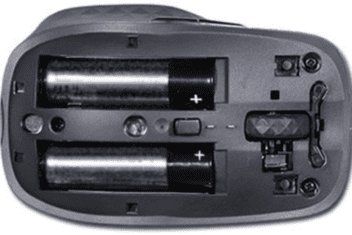
- Open the battery compartment on the mouse’s bottom and replace the batteries according to the diagram in the compartment if your mouse uses AA or AAA batteries.
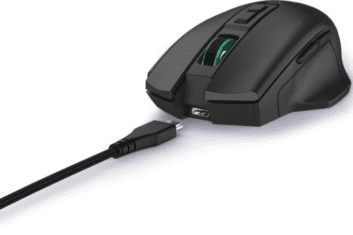
- Insert the micro USB or USB-C connection into the USB port on the mouse’s front or back if it uses a USB connection to charge. After that, connect the other end of the USB cable to a phone charger or a free USB port on your computer. Give the mouse a few hours to fully charge. The USB ports are usually located on the side of the keyboard on most laptops. The USB port is typically located on the front of the tower on desktop computers.
Step 2: Turn on the Logitech mouse. The On/Off switch is situated on the lower part of the Mouse.
Step 3: Put the mouse in pairing mode. How you put a mouse in matching mode shifts depending upon the model of the mouse. By and large, there is a button you press and hang on the lower part of the mouse. Counsel the client’s manual or maker’s site on the off chance that you want assistance placing the mouse in matching mode. When in pairing mode, the mouse will typically have a flashing light.
- On the bottom of some Logitech wireless mouse models is a Channel button. Press the Channel button on your wireless mouse to select a channel before pairing via Bluetooth.
Step 4: Select the Windows icon from the Start menu. The taskbar at the bottom of the screen contains the Start menu. It has the Windows logo on it.

- If you don’t have a mouse associated with your PC, there are ways you can utilize your PC without a mouse.
Step 5: Select Windows Settings from the Settings icon. It is the icon in the Start menu that looks like a gear.
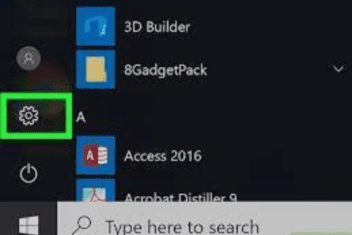
- On the other hand, you can squeeze Windows Key + I to open the Settings menu.
Step 6: Select “Devices” in Windows 10 or “MacButton|Bluetooth & Devices” in Windows 11.
![Click Devices (Windows 10) or {{MacButton|Bluetooth & Devices}] (Windows 11)](https://mraiexpress.com/wp-content/uploads/2024/06/Untitled-design-8-352x235.png)
It is the second option in the Settings menu on Windows 10 The symbol looks like an iPod and a console. On Windows 11, it’s the subsequent choice in the menu board to one side.
Step 7: Select Bluetooth and other devices (only for Windows 10). It is the first option in the left-hand menu bar. The Bluetooth menu will be shown here.
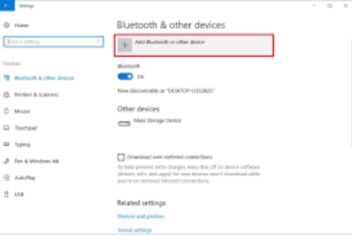
Step 8: On Windows 10, click Add Bluetooth or other devices, or on Windows 11, click Add Device. On Windows 11, it’s close to “Gadgets” and the highest point of the Bluetooth and Settings menu.
Step 9: Click Bluetooth. It’s at the highest point of the “Add a device” spring-up window.
Step 10: Click the remote mouse on your PC screen. The name of your Logitech remote mouse will show up in the Bluetooth or Other Gadget menu on your PC when it finds your Remote mouse. When you see it, click it. The Bluetooth or Other Device menu will contain a listing for your wireless mouse.
- On the off chance that you don’t see the mouse recorded, guarantee it is still in matching mode and has great battery duration.
3rd Method: Utilizing Bluetooth on a Macbook
Step 1: Make sure the battery in your mouse is fully charged. AA or AAA batteries are needed for some wireless mice. Other wireless mice use a USB connection to charge.
- Open the battery compartment on the mouse’s bottom and replace the batteries according to the diagram in the compartment if your mouse uses AA or AAA batteries.
- Insert the micro USB or USB-C connection into the USB port on the mouse’s front or back if it uses a USB connection to charge. After that, connect the other end of the USB cable to a phone charger or a free USB port on your computer. Give the mouse a few hours to fully charge. On MacBooks, the USB ports are typically on the console. On iMacs, the USB ports are typically on the rear of the screen.
Step 2: Turn on the mouse from Logitech. The mouse’s On/Off button can be found on the bottom.
Assuming that the mouse needs batteries, open the battery compartment on the base and check assuming it takes AA or AAA batteries. The battery compartment’s diagram should be followed when inserting the batteries.
Step 3: Change the pairing mode on the mouse. How you put a mouse in matching mode shifts depending upon the model of the mouse. By and large, there is a button you press and hang on the lower part of the mouse. Counsel the client’s manual or maker’s site on the off chance that you want assistance placing the mouse in matching mode. When the mouse is in pairing mode, it typically has a flashing light.
- On the bottom of some Logitech wireless mouse models is a Channel button. Press the Channel button on your wireless mouse to select a channel before pairing via Bluetooth.
Step 4: Select the Mac Apple icon. In the upper-left corner, it’s the apple-shaped icon. This shows the Apple menu.
- There are ways to use your computer without a mouse even if you don’t have one connected to your Mac.
Step 5: Snap Framework Settings… or Framework Inclinations… on more seasoned Macintosh models.
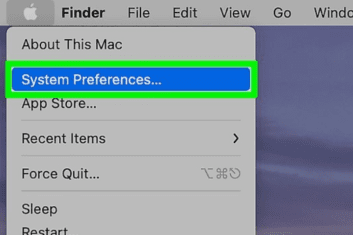
The Apple drop-down menu has it. This launches the System Preferences or Settings menu.
Step 6: Select Bluetooth for Mac.
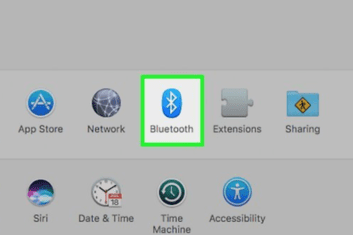
It can be found in the menu bar on the left in later versions of macOS. To view it, you may need to scroll down. On more established macOS renditions, it has a blue symbol that looks like a spiked “B” with a tail. From the menu, select Bluetooth.
- Alternatively, you can select Open Bluetooth Preferences by clicking the Bluetooth icon in the upper-right corner of the menu bar at the top…
Step 7: Make sure Bluetooth is on. Assuming it says “Bluetooth: Off” beneath the Bluetooth symbol on the left, click Become Bluetooth On to guarantee Bluetooth is turned on. Your Mac will begin looking for Bluetooth devices in the area.
Step 8: Hold the mouse cursor over your Logitech mouse.

At the point when your Macintosh finds your Logitech mouse, it will show up in the Bluetooth menu.
Step 9: Click connect. It shows up close to your Logitech mouse when you drift the mouse cursor over it. The Bluetooth mouse is connected to your Mac by this. You should be able to see the cursor on your screen move when you move the mouse back and forth.
4th Method: Chromebook Bluetooth use
Step 1: Make sure the battery in your mouse is fully charged. AA or AAA batteries are needed for some wireless mice. Other wireless mice use a USB connection to charge.
- Open the battery compartment on the mouse’s bottom and replace the batteries according to the diagram in the compartment if your mouse uses AA or AAA batteries.
- Insert the micro USB or USB-C connection into the USB port on the mouse’s front or back if it uses a USB connection to charge. Then, connect the other end of the USB cable to a phone charger or a free USB port on your Chromebook. Give the mouse a few hours to fully charge.
Step 2: Turn on the Logitech mouse. The mouse’s On/Off button can be found on the bottom.
Assuming that the mouse needs batteries, open the battery compartment on the base and check assuming it takes AA or AAA batteries. The battery compartment’s diagram should be followed when inserting the batteries.
Step 3: Change the pairing mode on the mouse. How you put a mouse in matching mode shifts depending upon the model of the mouse. By and large, there is a button you press and hang on the lower part of the mouse. Counsel the client’s manual or maker’s site on the off chance that you want assistance placing the mouse in matching mode. When the mouse is in pairing mode, it typically has a flashing light.
- On the bottom of some Logitech wireless mouse models is a Channel button. Press the Channel button on your wireless mouse to select a channel before pairing via Bluetooth.
Step 4: Select the Panel for Quick Setup.

The symbol shows the time, Wi-Fi strength, and battery duration. It’s in the lower-right corner. The Quick Setup Panel is shown in a pop-up window when this icon is clicked.
Step 5: Select the Bluetooth icon. The icon has a tail behind it that looks like a jagged B. To open the Bluetooth menu, click the Bluetooth icon in the Quick Setup Panel.
Step 6: Verify that the Bluetooth icon is turned on. On the off chance that the flip switch close to Bluetooth is switched off, click it to turn it on. Instead of being gray, the toggle switch should be blue.
Step 7: Use your wireless Logitech mouse. At the point when your Chromebook identifies your Logitech mouse, it will be shown in the Bluetooth menu. Connect your Bluetooth mouse to your Chromebook by clicking it. The cursor on the screen should move back and forth when you move the mouse back and forth.[1] Method 5 Troubleshooting PDF Download Article Step 1: Examine the surface you are using your mouse on.
5th Method: Troubleshooting
Step 1: Check the surface you are utilizing your mouse on. If you are experiencing irregular difficulty with your mouse, check to guarantee it is put on a smooth, level surface. You shouldn’t use your mouse on a surface that is too shiny or reflective. You can buy a mouse pad for your mouse if you need to.
Step 2: Ensure that your mouse is powered on. The first thing to check if your mouse is not functioning properly is that it is turned on. The on/off button is typically located on the mouse’s bottom. Turn it over and ensure the mouse is turned on.
Step 3: Verify that your mouse’s battery is in good condition. If your wireless mouse isn’t working right, make sure the batteries are new. Insert a new set of batteries if it requires AA or AAA, and check to see that it turns on. Connect it to a USB port on your computer or a wall charger and allow it to charge for a few hours if it charges via a USB cord.
Step 4: Connect your wireless dongle once more. Look for a “Connect” button if your wireless mouse comes with one. If it does, you can try reconnecting your wireless mouse to the wireless dongle by pressing this button. In the event that it doesn’t have an “Associate” button, counsel the client’s manual that accompanies your mouse for guidelines on the most proficient method to reconnect your mouse to your remote dongle.
Step 5: Repair your mouse with your PC. On the off chance that your mouse isn’t working as expected or your PC isn’t getting it, you can go into your Bluetooth settings, eliminate the remote mouse from your Bluetooth gadgets, and yet again pair it utilizing one of the strategies above.
Step 6: Confirm that you are within the wireless receiver’s range.
Move your mouse closer to your computer to see if it performs better if it is some distance from the wireless dongle or Bluetooth receiver.
Step 7: Verify that your USB port functions. Make sure the wireless dongle you’re using with your mouse is connected to a USB port that works. Check to see if connecting to a different USB port works. To see if it works, you can also connect it to a different computer.
Step 8: Ensure your USB and Bluetooth drivers are modern. On the off chance that a remote mouse isn’t dealing with your PC, your USB or Bluetooth drivers might be obsolete. Check your PC’s working framework for refreshes.
Step 9: Determine whether your mouse is aging. On the off chance that your mouse is north of a couple of years old, it may not proceed as well as it used to. It very well might be an ideal opportunity to get another one.